Patterns for getting started with serverless web applications

Starting out looking at serverless applications, it can be a bit intimidating for developers. You lose at lot of the built in functionality you are used to from traditiional web application frameworks and just getting something as simple as a basic web application running can be difficult.

I’m writing this as a guide for how to get started creating a web application that runs serverless, showing some approaches you can take.

Option 1 – Serve pure HTML from function and use public CDNs for static content

Use a serverless function (Lambda/Azure function etc.) to respond to HTTP requests by serving HTML, pointing to public CDNs for static content like JQuery or BootStrap. Custom JavaScript or CSS can be embedded directly in HTML. Can use micro web application frameworks in the function, like NodeJS Express, to generate the HTML response.

Advantages:

  • Simplicity, you are creating and deploying only functions
  • Easy to test locally, as you are only testing functions that serve HTML/HTTP responses

Disadvantages:

  • Your custom CSS and JavaScript must be embedded directly in your HTML, cannot be cached and will bloat your responses
  • Not normally suitable for production, doesn’t scale for complex web applications

Example:
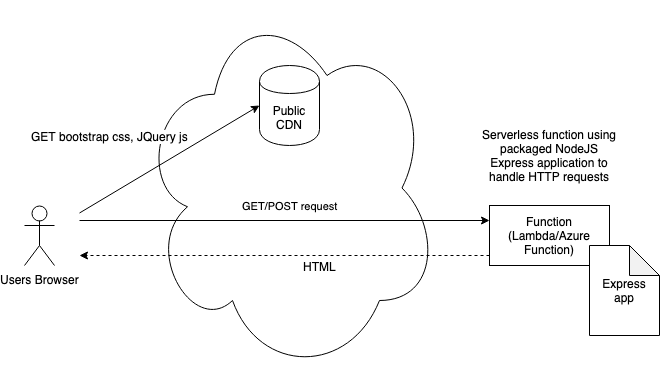
serverless-option-1-simple-function

Option 2 – Serve static HTML only from Bucket/Storage, as a single page application or for static GET requests with POST requests served by functions

Advantages:

  • Static site hosting is cheap to run (low request volume) and normally easy to setup
  • Can focus effort on using functions for simple API requests rather than serving more complex HTML

Disadvantages:

  • Single page application, requires clientside JavaScript and different programming approach which not all developers are familar with
  • Need either CORS setup to allow cross domain requests from browser JavaScript to functions or routing setup to serve both static site and functions from single domain. Requires significant setup
  • Testing locally requires multiple elements running together

Example:
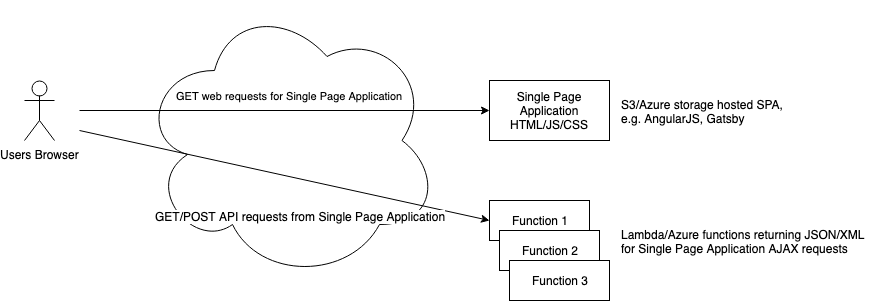
serverless-option-2-static-site-w-functions

Option 3 – Use combination of functions and static served resources from Bucket/Storage, fronted by routing to build a web site for a single domain

Advantages:

  • Can break up a complex web application into smaller parts, approach scales well
  • Once routing is in place can expand to include other services/components easily

Disadvantages:

  • Requires significant setup for routing to join together different components under single domain
  • Testing locally requires multiple elements running together

Example:
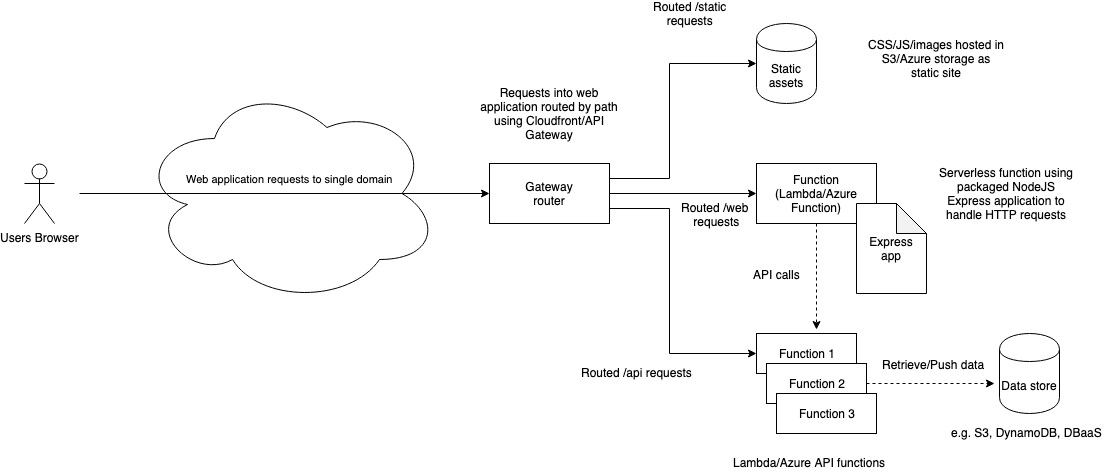
serverless-option-3-routing

Conclusion

If you are getting started I’d recommend starting small with the first approach, that way you can get to grips with the new tooling and serverless functions before you try more components. After you’ve done that you can expand to try more services with a decent foundation of knowledge (how to deploy, configure, test etc.) and won’t get overwhelmed with information.

AWS Cognito authentication example

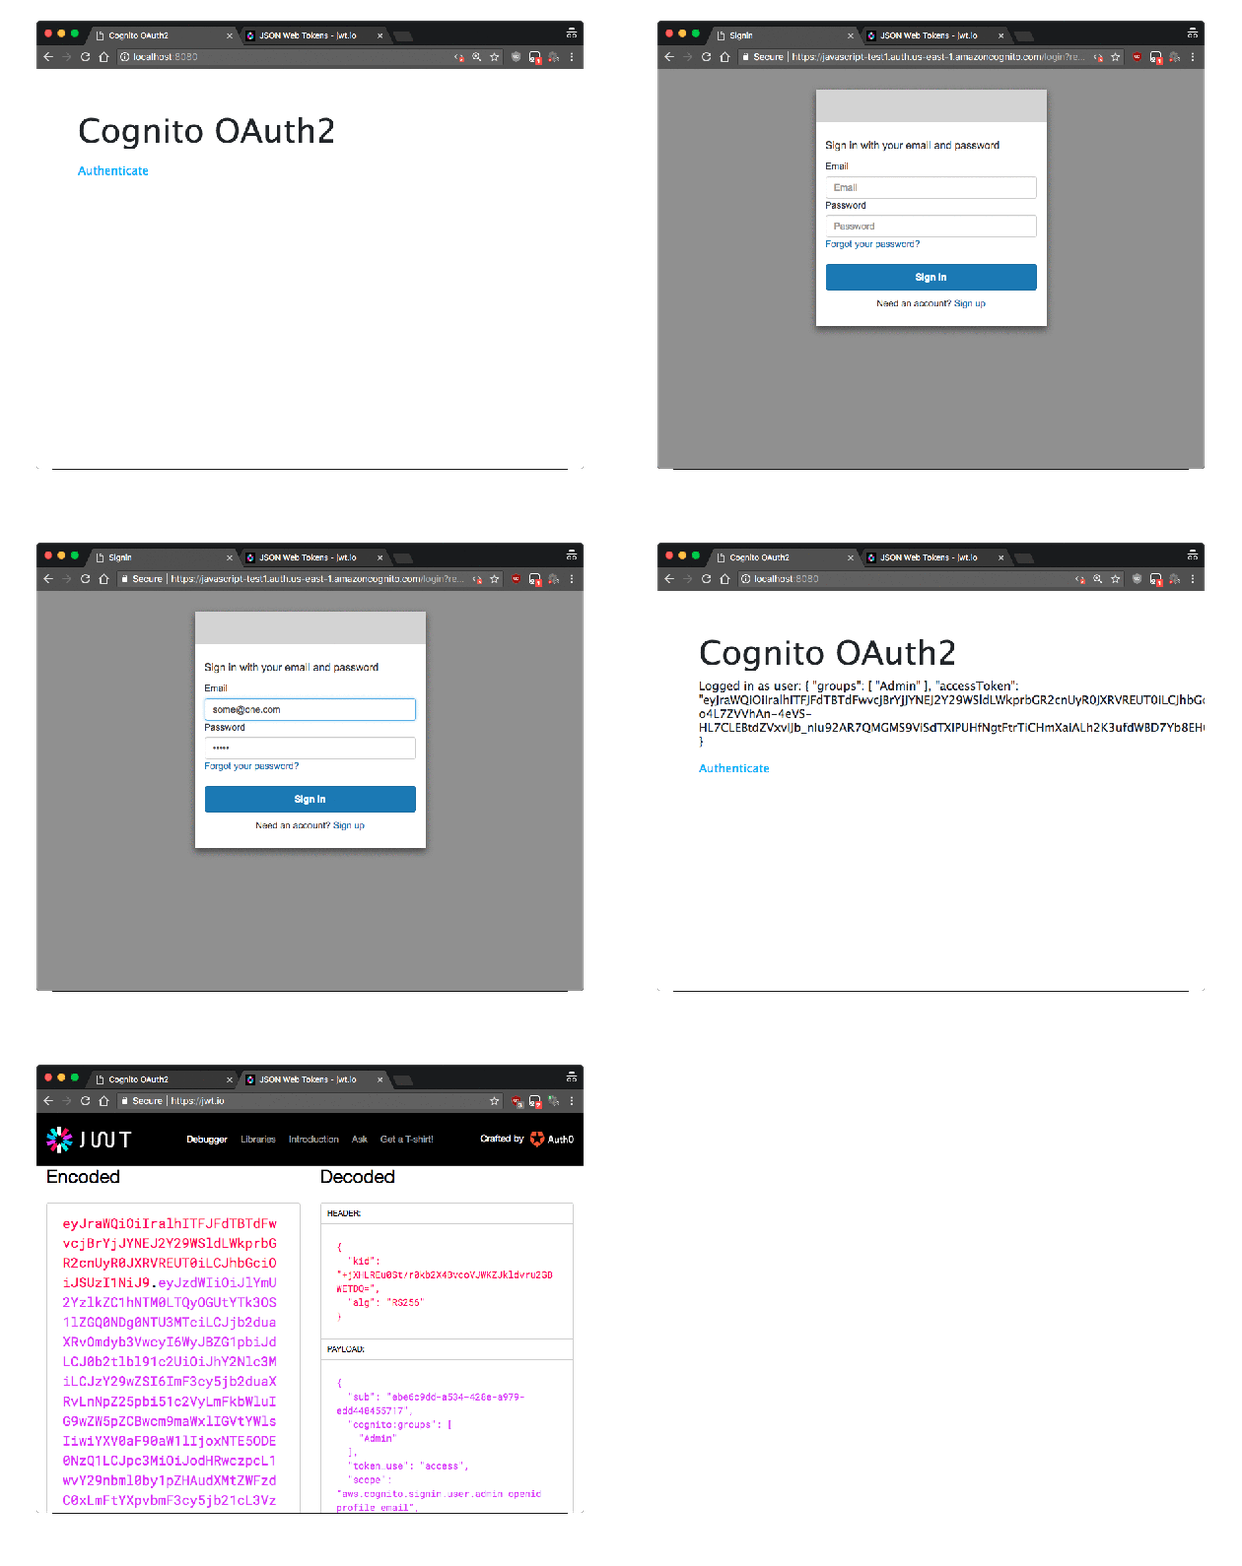
aws-cognito-animated

Writing this after investigating AWS Cognito as a possible managed authentication and authorisation service to avoid needing to implement our own. Hopefully it should help people attempting to understand Cognito and how it could be integrated into their application.

Cognito documentation generally focuses on the client side authentication functionality, useful in mobile application, but it has a lot of potential

My example NodeJS application is here, with details on how to configure Cognito for OAuth 2.0 flow.

Advantages for using Cognito:

  • Managed service, less components to implement/monitor/scale
  • Easily configurable via portal, CLI and templates
  • Supports multiple flows for authentication (client side, server side, OAuth2, custom)
  • Supports Lambda triggered functions on authentication/registration events
  • Uses JWT signed tokens which can be passed directly to clients in session cookies and used to verify requests and passed in related API calls so a single authentication/authorisation method can be used through your stack statelessly
  • Group membership, supplied in access token can be used for authorisation (e.g. users in group “Admin” can perform admin functions)
  • Handles:
    • User group membership and attribute storage
    • Email/Phone verification
    • User invitation
    • Login/Signup UI forms (customisable)
    • Password reset

Disadvantages:

  • Less control over authentication/authorisation (limits to UI/flow customisation)
  • Potential for lock-in (cannot export users with passwords for migration)


Below are some simplified diagrams showing how the integration can work.

Web integration with Cognito using OAuth 2.0 Grant Authorise flow

aws-cognito-oauth2

API integration with Cognito using ADMIN_NO_SRP_AUTH flow

aws-cognito-oauth2 (1)

Note that you can use the same Cognito User pool for both flows, so you call your API from your Web application passing the users JWT access token and use the same authentication/authorisation approach.

Useful links:

ASP Core custom filters exception handling

Had issues with an implementation of filters in an ASP Core application, so I made a small test application to check how different filters behave. Below is my source and my findings.

https://github.com/stevenalexander/AspCoreWebApplicationFilterExceptionHandling

  • CustomAuthorisationFilterAttribute is an ActionFilterAttribute, the simplest implementation of a filter which does not allow dependencies injected
  • CustomTypeFilterAttribute is TypeFilterAttribute, a more complex filter which allows dependency injection
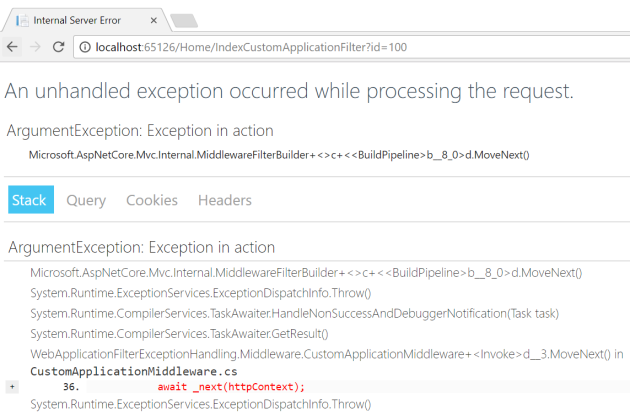
  • CustomApplicationFilter is a filter which uses an extension to add custom middleware to the request chain on demand. It allows dependencies but causes problems with exceptions which occur in the action, masking the stack trace and making it look like all exceptions occur in the middleware

customfilterExceptionInAction

Basic finding are that you should not use custom middleware as filters, since it causes side effects in exception handling in your application.

Links

Service healthcheck pattern

This is a simple pattern I’ve used on a number of projects to implement healthchecks as part of service monitoring. Whether you are making a scaled complex microservice solution or a simple web to API to database solution, having a set of consistent healthcheck URLs for all your components is extremely useful.

It requires two URLs on each web component in your architecture:

  • Healthcheck (e.g. /healthcheck) – returns 200 if the component thinks it is working correctly and can use it’s dependencies. This means checking it can hit any datastore required, reach any APIs it uses.
  • Status (e.g. /status) – returns 200 with no side effects

If either endpoint returns something other than 200 you know something is wrong, the healthcheck URL may respond with details on what’s failed but the status URL simply responds if the service is reachable and alive.

Most documentation on healthchecks only concern themselves with a healthcheck URL, which is fine when you are dealing with an individual component, but when you have a number of interconnected components which may also be interrogated by other applications (service discovery, load balancer etc.) having a status endpoint which does not trigger side effects is important.

Healthchecks can be expensive, making IO/network calls which place load on not just the component but other resources and services. A common issue is healthchecks causing cascades of requests to dependencies and other healthchecks after a release, which may cause false positives for failure when services take longer than usual to respond. Having the status URL means you can reduce the number of calls to the expensive healthcheck, offloading calls that only need to know if the component is alive.

Paging and sorting pattern for non-Javascript and Datatables

I like JQuery Datatables. It’s a easy to use JQuery plug-in that allows you to enhance an HTML table to support paging/sorting/filtering and all sorts of functionality with little configuration. It supports server side processing (something I’ve blogged on before) to allow serving large datasets.

But it has some issues.

By default it isn’t responsive and doesn’t play nice with small screens, it’s hard to style if you are using custom styling for your website and it will cause some accessibility issues. Also it needs Javascript, so sites that need to support no-js can’t rely on it for paging large tables.

Since I like the Datatables command patterns for API calls and don’t like duplicating logic, I’ve created this sample projectwhich shows how you can implement your model/view/controller logic and back-end logic to support serving a paged/sorted table both with Datatables and pure HTML GET requests on a page. This cuts down on the amount of logic needed and provides an easy to follow pattern for retrieving and using the paged data.

Even if you do not want to use Datatables it’s always good to use an approach which will be familiar to other developers and have a pattern that encourages code reuse and consistency.

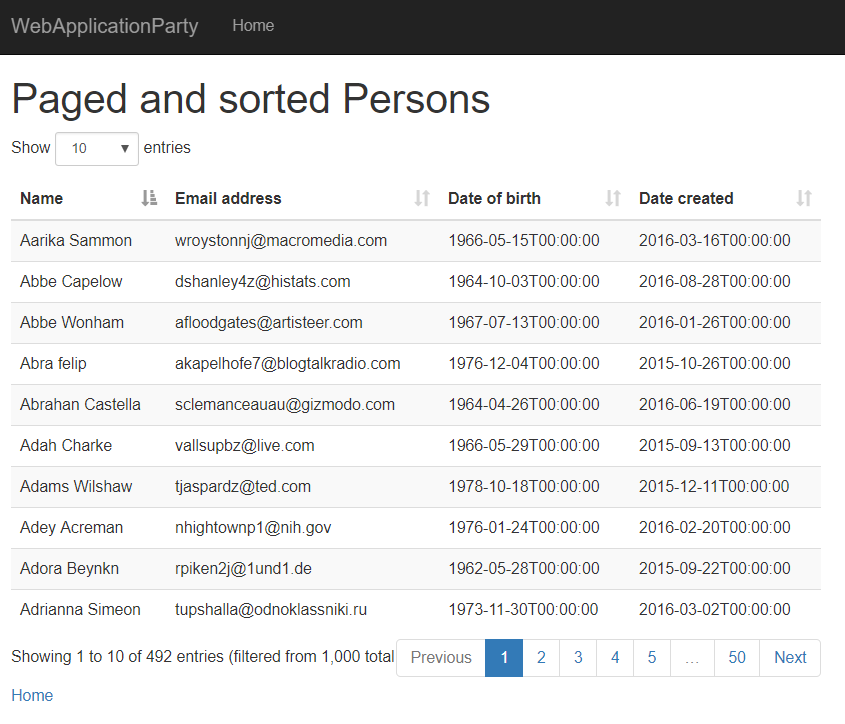
Here’s the sample Person list using Datatables:

person-list-js

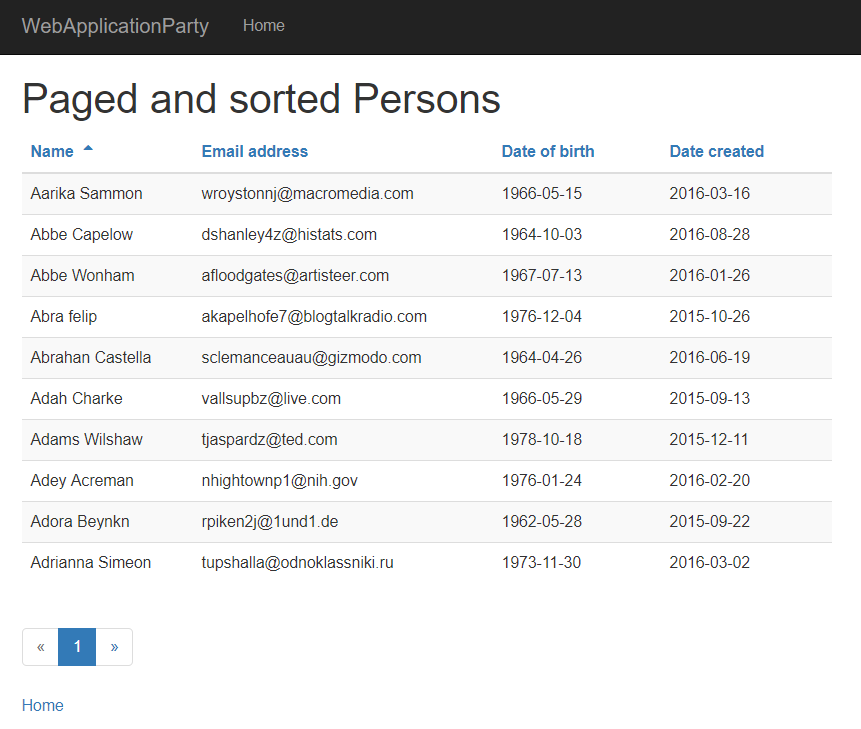
Here’s the same page with Javascript disabled using HTML GET requests for paging/sorting:

person-list

Datatables provides the quick AJAX redraw of the table with enhanced paging/sorting functions, while the HTML GET provides the non-Javascript support.

To implement this I used a number of classes with generics/abstract methods to allow re-use for different pages/tables:

PagedSortedViewModel – model that can be used for both JSON serialization in Datatable server-side and rendering HTML table.

   public class PagedSortedViewModel<TData> : IPagedSortedViewModel
   {
       public int Draw { get; set; }
       ...
       public IEnumerable<TData> Data { get; set; }
       ...
   }

PersonPagedSortedTableController – controller with routes for both HTML GET and Datatables JSON call

    public class PersonPagedSortedTableController : Controller
    {
        ...
        [HttpGet]
        public async Task<IActionResult> Index(int start = 0, int length = 10, string orderColumn = "Name", bool orderAscending = true)
        {
            var model = await GetPagedSortedResultsAsViewModel(0, start, length, orderColumn, orderAscending);

            return View(model);
        }

        [HttpGet]
        public async Task<JsonResult> DatatableJson(int draw = 0, int start = 0, int length = 10)
        {
            var isAscending = Request.Query["order[0][dir]"] == "asc";
            int columnIdentifier = Convert.ToInt32(Request.Query["order[0][column]"]);
            string orderColumnName = GetColumnName(columnIdentifier);

            var model = await GetPagedSortedResultsAsViewModel(draw, start, length, orderColumnName, isAscending);

            return Json(model);
        }

        private async Task<PagedSortedViewModel<PersonResultItem>> GetPagedSortedResultsAsViewModel(int draw, int start, int length, string orderColumn, bool orderAscending)
        {
            var result = await _pagedSortedRepository.GetPagedSortedResults(start, length, orderColumn, orderAscending);

            return new PagedSortedViewModel<PersonResultItem>
            {
                Draw = draw,
                ...
                Data = result.data,
            };
        }

        private string GetColumnName(int columnIdentifier)
        {
            switch (columnIdentifier)
            {
                case 0: return "Name";
                ...
            }

        }
    }

AbstractPagedSortedRepository – abstract repository class that has a number of virtual and abstract methods, wiring together the queries needed to return the paged/sorted result set so that minimal custom logic is needed for each different table.

    public abstract class AbstractPagedSortedRepository<TResultItem> : IPagedSortedRepository<TResultItem>
    {
        public async Task<PagedSortedResult<TResultItem>> GetPagedSortedResults(int start, int length, string orderColumn, bool orderAscending)
        {
            var innerJoinQuery = GetQuery();

            var recordsTotal = await GetRecordsTotalQuery(innerJoinQuery).CountAsync();

            var whereQuery = GetWhereQuery(innerJoinQuery);

            var recordsFiltered = await GetRecordsFilteredQuery(whereQuery).CountAsync();

            var sortedWhereQuery = GetSortedWhereQuery(whereQuery, orderColumn, orderAscending);

            var pagedSortedWhereQuery = sortedWhereQuery.Skip(start).Take(length);

            var data = await pagedSortedWhereQuery.ToListAsync();

            return new PagedSortedResult<TResultItem>
            {
                recordsTotal = recordsTotal,
                recordsFiltered = recordsFiltered,
                data = data,
            };
        }
        ...
    }

PersonPagedSortedRepository – Implementation of the abstract repository for a table showing joined results of the Person/Party entities.

public class PersonPagedSortedRepository : AbstractPagedSortedRepository<PersonResultItem>
    {
        ...
        protected override IQueryable<PersonResultItem> GetQuery()
        {
            return from p in _partyDbContext.Parties
                   join o in _partyDbContext.Persons on p.PartyId equals o.PartyId
                   select new PersonResultItem { PartyId = p.PartyId, Name = p.Name, EmailAddress = o.EmailAddress, DateOfBirth = o.DateOfBirth, DateCreated = p.DateCreated };
        }

        protected override IQueryable<PersonResultItem> GetSortedWhereQuery(IQueryable<PersonResultItem> whereQuery, string orderColumn, bool orderAscending)
        {
            switch (orderColumn)
            {
                case "Name": return orderAscending ? whereQuery.OrderBy(x => x.Name) : whereQuery.OrderByDescending(x => x.Name);
                ...
                default: return whereQuery;
            }
        }
    }

The view renders the table, and has Javascript to use Datatables if Javascript is enabled (hiding HTML paging/sorting controls).

Links:

Why you should use Git command line

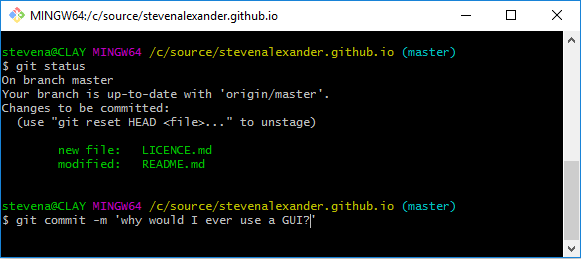
git-cli

Writing this for developers, testers, UX designers or anyone who might interact with source code stored in Git but as yet hasn’t used Git command line, instead uses a GUI or integration (Tortoise, Source Tree, Intellij/VS integration etc.).

Git command line is the low level program that interacts with git repos in a terminal or powershell window. I know that using the terminal and typing commands is a big step for most inexperienced users, but please stick with me and hopefully I’ll convince you.

Why you should use Git command line

You will know and understand what you are doing

Most people I’ve known starting with Git first start with a GUI tool. Something to handle Git for them. While understandable, this is a mistake as you do not know what the tool is doing or learn how Git works.

GUI tools will be using the same Git commands under the hood, they will just hide them from you. Whether you are learning source control from scratch or just new to Git it will help you in the long run to understand what the basic commands are and what they do.

You will know exactly what you are changing

Source control GUI tools hide some of the complexity of using git, but in doing so hide what they are actually doing. This can be as simple as pre-selecting the list of modified files for a commit, or as complex as handling a merge for you. Either way, you no longer know exactly what the tool is doing and changing.

With Git command line you are forced to declare exactly what files in source you are changing and can see exactly how they have changed.

git status and git diff, how I love you.

It’s not that complicated

My normal day to day use of git only uses 7 commands; pull, checkout, status, diff, add, commit and push.

Truthfully, for anything more complicated I just search for it. I haven’t memorised much else and you shouldn’t have to either.

Command line is universal

Git command line is the same on every machine, every environment. Learn it once and you won’t have to learn it again. Not if you switch editor, language or go from Windows to Mac. The commands won’t change.

Different GUI tools use different UI, different names for the actions and even apply different low level operations for actions, e.g. may automatically pull before a push or rebase.

Even authentication is standardised, as you can setup your ssh key so you don’t need to keep entering username/password for operations.

How to learn Git command line

It’s easier than ever to pick up and learn git, here’s a few resources to help you start:

Conclusion

I hope this has convinced you to give Git command line a try. If not at least you will understand why I sigh when I see you trying to fix a git issue with your mouse.

Using private Nuget packages hosted in VST

Writing this as a quick guide to using your own private Nuget packages hosted in a private feed in VSTS for dotnet core. There is official documentation but I encountered enough issues that I think it’s worth documenting.

1. Install Package Manager into your VSTS

You must install Packagse Manager extension into VSTS. There’s a 30 day free trial, after which you must pay.

Setup your private feed, this will be used to publish your private packages to authenticated VSTS users needing the packages in Visual Studio and in the VSTS builds.

2. Create your Class Library needed as a package

Create the Class Library project in Visual Studio which you need packaged.

NOTE: As of writing in dotnet core you must create as Console App and update to class library in project properties->Application->output type due to issues with templates.

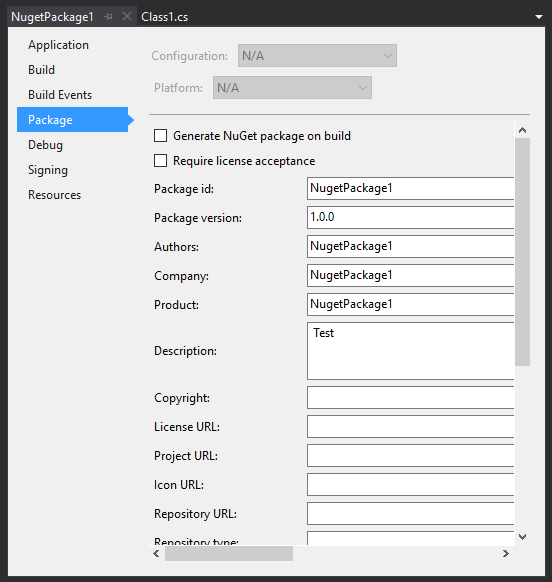
In project properties->Package setup the package metadata. Do not check “Generate Nuget package on build”. Version number will be overridden in VSTS build definition.

nugetp

3. Setup VSTS Build definition for Nuget Package

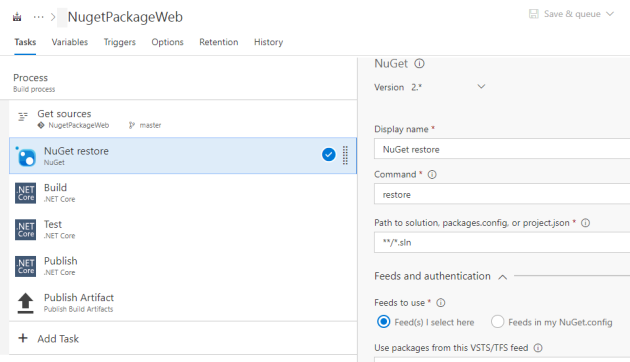
Add a new build definition for your Class Library repo/project, based on the template for ASP.NET Core template (sets defaults for project paths and build version number).

  1. Remove the Publish setups.
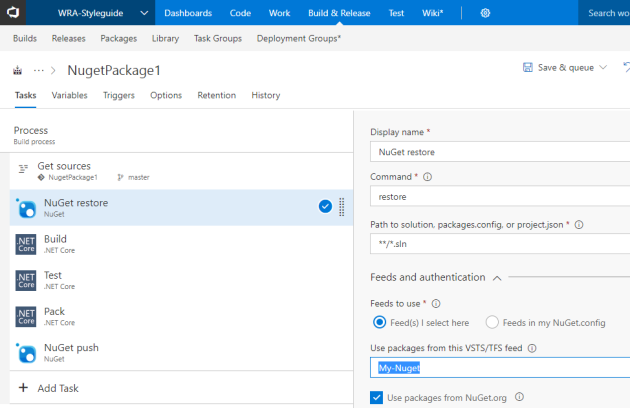
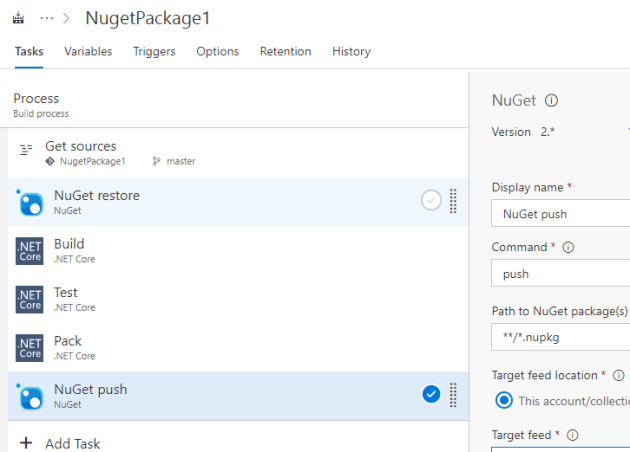
  2. Replace dotnet restore with a Nuget task restore (to allow using your own feed).nuget1
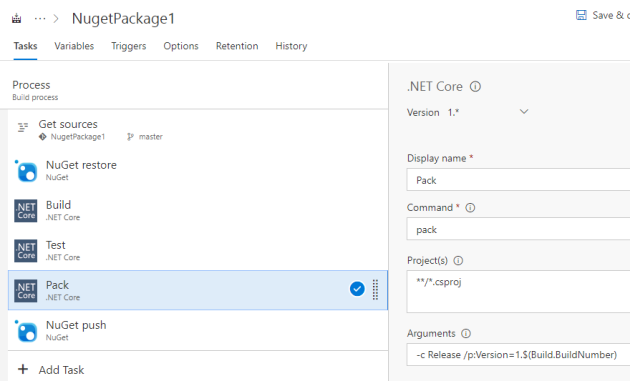
  3. Use a dotnet pack task to build the Nuget package with explicit version number based on build.nuget2
  4. Use a Nuget task to push the build package to the private feed.nuget3

4. Reference your private Nuget package in another project

Add a Nuget.config file to your project which needs the private package dependency to use the private Package Manager feed.

nugetconfig

You can also add this in your Visual Studio global Nuget.config but makes the feed explicit for others using the same source. You will be prompted to authenticate with VSTS the first time you build to resolve the dependency from the feed.

In the build definition for the project add a Nuget Restore step which references your private feed (standard dotnet restore will not pick up the Nuget.config or authenticate with the private feed).

nuget4

Tricks and traps (as of writing 2017/07/25):

  • Standard agent queue “Hosted” does not support dotnet core, use “Hosted Visual Studio 2017
  • dotnet restore does not support using Nuget.config or authenticating with private feed, use Nuget restore task
  • Nuget pack does not support dotnet core packages, use dotnet pack with explicit version option

Getting word count from template files

Recently I had to get an approximate word count of an entire site for estimating translation time. To do this I processed the template files to get all the non-html tag/logic content using find and sed, then counted the words using wc.

# from views directory

# create .out files with HTML tags stripped
find . -name '*.html' -exec sh -c 'sed -e "s/<[^>]*>//g" $1 > $1.out' -- {} \;

# create .out.bout files with nunjucks/jinja2 tags stripped
find . -name '*.html.out' -exec sh -c 'sed -e "s/{[^}]*}//g" $1 > $1.bout' -- {} \;

# word count
find . -name '*.html.out.bout' | xargs wc -w

Links:

Session data is the manageable devil you know

devil-29973_640

Last year I wrote a bit of a rant post “Session data is evil” coming out of some projects which suffered from session related problems. Time and some experience trying to avoid sessions have softened my opinion, so I thought I would write a counter-point to that post.

It’s extremely hard to avoid state

People think in states. They naturally work incremently, adding a little here, editing/removing a little there, not in large atomic chunks. The means they don’t like large complex forms that require everything being entered/edited at once. They also expect little things that require state, remembering preferences and where they were in an application process. While it is possible to break down your application while avoiding state, it means increasing the complexity of your persistence and routing, adding complexity.

Session data is the most straight forward way to deal with these hidden requirements.

Dealing with sessions is a known problem

Sessions may be tricky, but there’s decades of experience dealing with them. Most web servers and frameworks have explicit tools and best practises for using them, supporting sticky sessions and external session state for multiple web servers.

Using sensible approaches it is entirely possible to scale and handle sessions correct.

Over engineering causes worse problems

If in an effort to remove sessions you add tons of persistence and routing complexity, you are just adding more code and places for things to go wrong. A simple session based approach is easier to maintain and understand than a over-complicated stateless one that is making explicit calls every request. It will work fine so long as you use session sensibly, encapsilate it, understand the limitations and how it will work in production conditions.

Large scale and PaaS applications may have to be much more careful, but there are still ways to work with sessions for them.

Conclusion

Don’t abandon session out of fear or fashion, it’s a simple and extremely common approach for managing state in a world that demands it, just don’t shove everything in there…

The symmetrical architecture trap

Often when thinking about topics to write about I hesitate, as in retrospect what I’m saying seems obvious. But it’s very common to fall into simple patterns when you are in the thick of a project, doing something which the flaws only become apparent later when early chaos is over and you can think clearly.

One of these traps is symmetrical application architecture, making two similar components in your solution use the same architecture, even when they have different requirements.

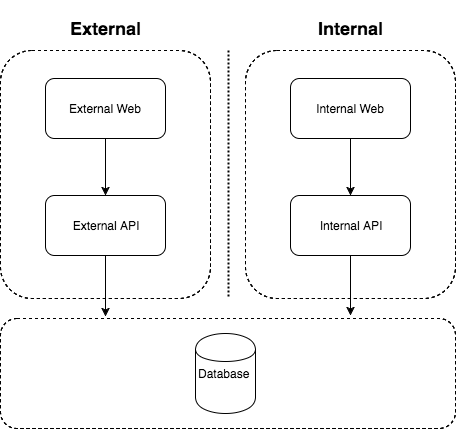
A common example of this is when a web application will have a public facing external site and a more secure internal site for administration. On the surface these two components have similarities, they both serve HTML and need to access/persist data, so you may initially use the same architecture for them.

Symmetric architecture diagram

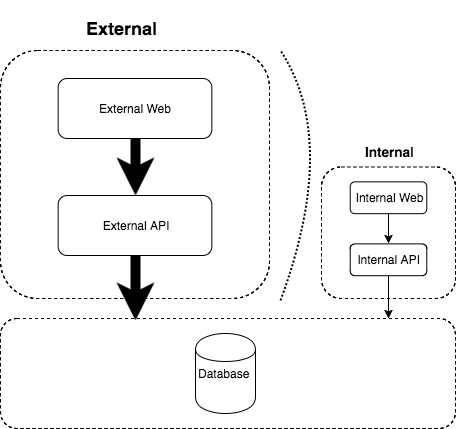
However, you soon realise the external site needs to handle much more traffic than the internal, and it’s data requirements are different (higher read or write, only needing access to specific data). You can resolve this by scaling the architecture, but it’s clunky.

Symmetric architecture with external load diagram

Then you realise the internal site has more security and auditing requirements. You can resolve with implementation changes but it would be neater to include additional layers or services.

Symmetric architecture with internal audit security diagram

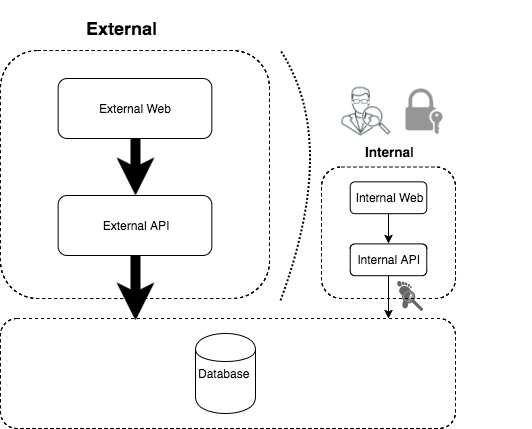
The symmetry of the architecture becomes a conceptual barrier to change, changing either one appears to be introducing more complexity but in reality the implementations are diverging anyway due to their different circumstances. Looking at them individually and at how they will be hosted on less abstract infrastructure diagrams can help. Could be your external and internal sites don’t need the same data store or layers, and changing them could save resources and simplify implementation.

Asymmetric architecture diagram

Embracing asymmetry in your architecture early can help you break out of this mindset and prevent you hitting problems later when your implementation work arounds start to creak.