Using .NET Web Deployment Packages for single build releases parameterized for multiple environment deployments

The titles a bit of a mouth full but I think this is a common requirement for deployments, where a release is built once and then deployed for different environments (e.g. first UAT then Production when finished testing).

When I first used Visual Studio 2010 I noticed the new Web.config.Debug/Web.config.Release transformation and thought it would be a handy feature, but after looking at build/deployment scripts for a project I’ve realised it’s useless for the kind of releases I do. I’ve never deployed directly from Visual Studio, it’s always been build the release via msbuild then copy the release onto target environment and use msbuild to perform deployment tasks. Setting environment specific configuration values was either done manually (nasty) or by xml transformations in msbuild script (messy). Web.config transformations seemed to fix this but require one unacceptable compromise, separate builds per environment for a single release, since the transformation is only applied at on build and it’s apparently not possible to use the same internal targets to transform the configs afterwards for deployments (please correct me if you know how). Since multiple builds makes tracing issues more difficult I wouldn’t want to risk using it.

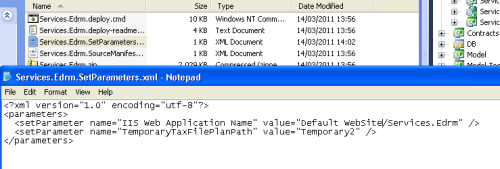
As an alternative you can use Web Deployment Packages, which build and zip up your web application (asp/mvc/wcf etc.) with a neat script for deploying it straight onto the web server (creating virtual directories automatically) and using a “SetParameters.xml” file to hold environment specific configuration. If in your application you include a file called “parameters.xml” with all environment specific configuration (see here for details) when you build deployment package (by msbuild in the release or right clicking in VS) your “SetParameters.xml” will contain the names/default values of the configuration values. Its then a matter of maintaining environment specific versions of the SetParameters.xml file and using them when deploying the web packages by command line.


Capture
Capture1

See this blog post for details on how to set parameters correctly and get the web deployment package from here.

ASP.MVC – JQuery – Hide/Show elements using class

Not specifically ASP.MVC related, but I used JQuery because of it so I’m grouping it in anyway.

Created for a screen which needed to hide/show controls based on a radio button list selection, something which I’ve done before but the simplicity of how to implement it with JQuery impressed me so I’m blogging it.

It uses two bits of standard JQuery functionality, selecting elements based on class and applying css styles to the selection of elements.

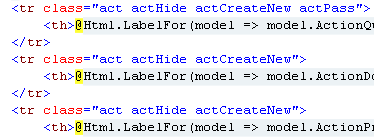
  • Decorate the elements to hide/show with css classes which will control when they are displayed, table rows in this example:

Capture

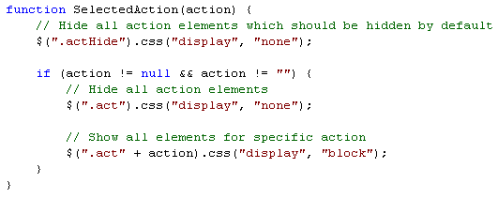
  • Then create a Javascript function which will use the JQuery class selector to find those elements and set the css to hide/show, this function will be called when the document is loaded to setup the page based on the selected radio button value.

Capture

Simple! Doing it using plain JS would have been much longer and harder to maintain (changing the elements to display just requires modifying the classes).


ASP.MVC – Custom validation without using Data Annotations

This is intended as one of a series of posts on ASP.MVC 3 (Razor) about tips and traps as I learn, feel free to comment with advice or anything to help me or others.

All the ASP.MVC tutorials I’ve seen show validation being performed by using Data Annotations on the Model properties and calling ModelState.IsValid in the controller. This is great for normal validation but has some drawbacks when you need to do some complicated stuff.

I had a screen containing a radio button list, clicking a radio button hide or displayed certain fields, changing the mandatory fields for the screen. This made using the base MVC 3 Data Annotations not an option, as marking any of the fields as required would cause them to always be required regardless of the selected radio button. If this was something I would reuse I would probably create a custom validation attribute (link on how to do that) but it was only needed for that screen and quite specific.

Instead I used the ModelState.AddModelError, which allowed me to put my custom validation in the controller:

Capture

Some points to note:

  • The field name you supply in AddModelError is used by your “ValidationMessageFor” tags in the view, so will affect how control styles. Use a field name for a button/hidden field if you don’t want validation styles applied to a specific field control for the error.
  • If the field uses DataType validation (e.g. is an int/DateTime in model) and the value entered was invalid for the DataType using AddModelError will cause the DataType validation error message to display as well as your custom message.

Using Visual Studio WCF test client for your new WCF web services after renaming service

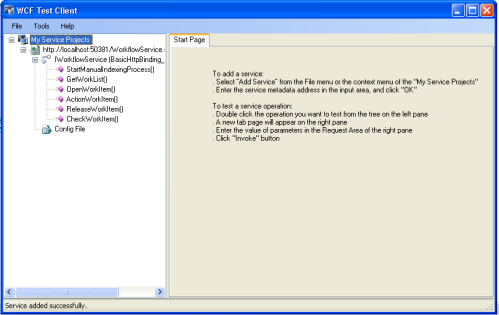
Visual Studio 2010 comes with a built in test client for testing and debugging your WCF web services, but if you’re like me you haven’t used it much because it never activates when debugging your WCF web application (it opens a browser window instead) after you changed the service name from Service.svc.

I just realised this is because it loses the svc file as the start page, if you right click on your svc file and select “Set as Start Page” it will open the WCF test client and allow you to debug away.

Capture